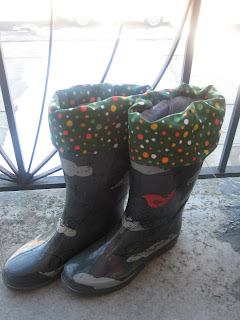
I love my rain boots! They make me feel powerful, like I can walk through anything. However, when the temp drops my toes get a little chilly. So I was thrilled to find this tutorial from Sabbe Interior Design.
Every time we get some snow here in New York (which has been quite a lot lately!) I kick myself for not putting these together already. FINALLY, I did, and I love them! The tutorial was lovely to look at, but a little tricky to follow for me but I got it eventually.
If you want to try it out yourself, here are some tips: When it says you need 2 pieces of patterned fabric, 9X4, they really mean per sock. So, for 2, you would need 4 pieces - or, you could use 2 pieces of 18x4 instead to make things a little less complicated.
I couldn't find the boot pattern - maybe I'm just clueless - but I traced my own boot and it worked fine. You can pull out the insert of your boot or a sneaker for the sole, or trace your foot like I did.
Sew together the boot parts first, then pin and sew on sole, not all three at once.
When you're sewing on the patterned piece at the top, stretch the fleece to fit to it, since the patterned cuff will be larger than the fleece. You want that, though, so the socky part stays snug to your leg and the cuff part has enough room to fit around the outside of your boot.
Also, it calls for 1 yard of fleece and 1 yard of elastic - you don't need that much. I think you could pull it off with 1/2 yard of fleece, and for the elastic, you just need enough to go around the widest part of your calf X 2 (so you have enough for both legs).
I hope this makes sense - I think if you try it it will, but let me know if you have any other questions.
Now I'm pumped for precipitation this week! Wishing you toasty toes, too.


you NEED to sell these on your etsy page. pure genius!
ReplyDeleteThanks! I think I may - I NEED to restock my shop. Be on the lookout :)
ReplyDeletethose turned out really great! love the polka dot fabric you chose :)
ReplyDeleteKatie (kateandoli from swap-bot)
www.kateandoli.blogspot.com
swap bot: hkz1985
ReplyDeleteI love these boots. I live in rainy Oregon and need to do something like this too!
Okay, I feel completely silly. I kept waiting for the part where you sew the "sock" to the boot and/or shaped the rubber for the boot. Then I realized how silly I was, because, OF COURSE, you wear the socks IN the boot! One of those 'Where was my mind?' moments. That said, I think these are fantastic. :)
ReplyDelete--BrandiAM from swap-bot
Same here. And then snow is over and I do not think about making these until ...it snows again. And repeat. And repeat. But you gave some good tips! Maybe, just maybe...I will make myself a pair to fit my pink flower rubber boots.
ReplyDeleteGladly reading and following your blog now through swap-bot.
Thanks for all of your enthusiastic comments! I've actually made a couple more pairs for some pals and they like them too. A note - just be careful of the bias of your fleece - make sure the top part where the opening will be is stretch and not on the grain, otherwise it will be too tight.
ReplyDeletethis is so cute and well done! today, during san francisco's rainstorm i was 1. thinking how nice it would be to have rain boots and 2. concerned that if i did have boots, the rain would just fill them right up to the top with water. it was raining sideways today!
ReplyDeletethis might have solved that hypothetical issue!
cheers,
rootmix
swap-bot
We got so much snow this weekend that I thought it might go in the top of my boots - but I was lucky. These came in handy! Thanks for following.
ReplyDeleteCool boots!
ReplyDeletefii - swapbot