Sunday, December 25, 2011

Have Yourself a Merry Little Christmas

Merry Christmas to you!  I hope everyone out there is having a lovely holiday. 


Here is some Michael Buble to spread the cheer. I went to the dress rehearsal of Saturday Night Live last week, where he was the musical guest. I didn't get it before but now I do. I love Mr. Michael Buble. Liquid Gold, that voice. Anyway, have fun!!


Wednesday, December 21, 2011

Secret Santa Fail (but a yummy recipe!)

We had Secret Santas at work last week, and I nearly killed mine. 


For a little surprise, I decided to make him some sweet treats, and tried out this recipe from Real Simple, for a Chocolate Pecan Tart.  Little did I know that he was allergic to nuts.  Yikes.  Luckily it was pretty clear from looking at them that they had nuts so he didn't eat any.  But I felt TERRIBLE and couldn't even apologize until a few days later because that would reveal my identity!  (I did make him some chocolate chip cookies to make up for it.)

Anyway, I sampled the recipe and it was really good!  If you like/aren't allergic to nuts.  I used walnuts instead of pecans because that is what I had, and added some extra chocolate chips and cream to fill out the larger pan I had used.  But overall, it was delish!  Try it yourself...makes a nice gift too, if you know your audience's dietary restrictions.  (So sorry, Frank!!!!)

Chocolate Pecan Tart
from Real Simple


serves 8     Hands-On Time: 15m      Total Time: 2hr 30m

Ingredients
1 3/4 cups pecan halves (I used walnuts)
1 1/4 cups all-purpose flour, spooned and leveled
1/4 cup unsweetened cocoa powder
1/2 teaspoon kosher salt, plus a pinch for the filling
1/2 cup (1 stick) unsalted butter, at room temperature
1/4 cup sugar
2 large egg yolks
1/2 pound semisweet chocolate, chopped (I ended up using an entire bag of chocolate chips, which is 4 oz more than 1/2 lb)
3/4 cup heavy cream (added some extra cream too, to melt the additional chips)

Directions
1.Heat oven to 350° F. Spread the pecans on a rimmed baking sheet and toast, tossing once, until fragrant, 6 to 8 minutes. Let cool, then roughly chop. In a medium bowl, whisk together the flour, cocoa powder, and salt.

2.Using an electric mixer, beat the butter and sugar on medium-high until creamy, 2 to 3 minutes. Beat in the egg yolks. Reduce mixer speed to low and gradually add the flour mixture; mix until combined but still crumbly.

3.Press the dough into the bottom and up the sides of a 4-by-14-inch rectangular (or 9-inch round) tart pan.  (I used a square 8x8 inch baking pan.)  Line with a large piece of parchment paper, leaving an overhang on all sides, and fill with dried beans or pie weights.  (I didn't have parchment and couldn't find my pie weights, so I skipped that.  The crust was a little puffy but it worked out fine.)  Place the pan on a rimmed baking sheet and bake until the edges of the crust are dry, 20 to 22 minutes. Remove the parchment and beans and bake until dry and set, 10 to 12 minutes. Let cool completely.

4.Meanwhile, in a large bowl, combine the chocolate and pinch of salt. In a small saucepan, bring the cream to a bare simmer; pour over the chocolate and let stand 1 minute. Stir gently until the mixture is smooth. Stir in 1½ cups of the pecans. Pour the mixture into the cooled tart shell and sprinkle with the remaining pecans. Refrigerate until set, at least 1 hour.

Tuesday, December 20, 2011

...And because I don't want to start WWIII...

I put this one together last night for a special young man who is learning his letters this year. 

Ok.  I need to stop.  These kids are going to be SO spoiled!  But that is what being an aunt is about, right? 

Monday, December 19, 2011

Pillow Talk

 Here is a fun little quilty pillow I whipped up for my niece Rakia.  I think she'll like it!  It has lots of fun patterns with ladybugs and cats and critters and what not.  It was so simple to put together too!  I used a bunch of scraps, cutting them into 3x3 inch squares, using 25 total. 


I sewed them in 5 rows of 5, then stitched each row to the next to make the front.  For the back I just used some larger pieces of scrap fabric, following the idea of this awesome super easy pillow cover tutorial from Sparkle Power

So, even if you haven't finished your Christmas shopping ...you still have time to put together one (or ten) of these for a great handmade gift!  For the inside you can use pillow forms or, I buy cheap pillows at Ocean State Job Lot (or whatever discount store you might have) for $5 (or less) each, then just cover them in a fun fabric myself. 

Yay!  Pillow fight! 


Sunday, December 18, 2011

Berry Bread

I was in a bread bakey kind of mood today, but couldn't find yeast at Pathmark.  I know it's there somewhere, but it was so crowded and crazy I couldn't deal with the search. 


But I did recall that I had wanted to try this recipe from Real Simple and had the ingredients on hand...kind of.  (Another instance of couldn't find something at Pathmark...this time I subbed a frozen berry blend for cranberries.)


It came our pretty well!  Tasty.  Although next time I might use walnuts instead of hazelnuts.  They seemed a little unwieldy and I think walnuts would work a little better.  But give it a shot!  This would make a nice gift loaf for the holidays...or anytime!

Emma's Attempt at Cranberry Hazelnut Bread
From Real Simple


Serves 8
Hands-On Time: 10m
Total Time: 2hr 30m

Ingredients
1 cup hazelnuts (again - I might try walnuts next.  Pecans or other nuts would probably work well too)
2 tablespoons unsalted butter, melted, plus more for the pan
1 1/2 cups all-purpose flour, spooned and leveled
1/3 cup granulated sugar
1/4 cup packed light brown sugar
1 tablespoon baking powder
1/2 teaspoon kosher salt
1/2 cup whole milk (the mixture seemed a little dry - I added a few tablespoons additional milk)
2 large eggs
1 tablespoon finely grated orange zest
1/2 teaspoon pure vanilla extract
1 1/2 cups fresh or frozen cranberries (I used frozen berry blend)

Directions

1.Heat oven to 350° F. Spread the hazelnuts on a large rimmed baking sheet and toast in oven, tossing occasionally, until fragrant, 10 to 12 minutes. Rub the warm nuts in a clean dish towel to remove the skins (discard the skins); coarsely chop.  (I let the nuts cool before removing the skins - try it when they are still warm.  It will make life easier.)

2.Butter an 8½-by-4½-inch loaf pan. In a medium bowl, whisk together the flour, sugars, baking powder, and salt. In a small bowl, whisk together the butter, milk, eggs, orange zest, and vanilla; add to the flour mixture and mix until just combined (do not over mix). Fold in the hazelnuts and cranberries.

3.Transfer the batter to the prepared pan and bake until a toothpick inserted in the center comes out clean, 55 to 65 minutes (tent with foil if the top browns too quickly). Cool in the pan for 30 minutes, then transfer to a wire rack to cool completely.


Friday, December 16, 2011

Baby Bedding

 My little niece Rakia is pretty cute. 
Even when she is a goofball.  (Or, especially then.)  So for Christmas I wanted to make her something super adorable.  She loves her baby dolls, so I thought I'd whip up a little bed for them to take a rest - here is my experiment!

 
 Sweet, huh?  I wrapped an empty clementine cake in fabric, then made a little mattress and pillow out of scraps (and filled with smaller scraps.  The project was basically free - since I already had all the materials on hand!
 To top it off and keep the little baby toasty warm, I made a reversible quilt.  I really hope Rakia likes it!  I think she will. 

Wednesday, December 14, 2011

Christmas Countdown Calendar!

Happy Holiday Season Everyone! 

I wanted to share a fun craft I put together for celebrations.com, and that my lucky niece and nephew, pictured here:

are enjoying this month. 


I had a fun time making it - and as always, it was really inexpensive and relatively simple to put together.  Selecting tiny treats to fill it was SO fun too! 

Check out this post to see how I did it! 

Happy December!

Monday, October 31, 2011

Happy Halloween!!

 HAPPY HALLOWEEN EVERYONE!!!
I hope you all had a delightful time this weekend at your parties, and that all of you little trick or treaters have a great time tonight!  I wanted to share the finished product of my She-ra costume - ta da!!


 And even better - my friend Matt decided to be He-man!  So of course we had to celebrate the festivities together on Saturday night. 


We came up with these costume ideas separately - but what a lovely coincidence!  I gave Matt a hand in putting together his costume too.  I think we both look pretty cool!  Cool enough to brave the crazy rain and snow this weekend in costume, anyway.  We had to share the power of Grey Skull with the world, you know. 
Matt's roommate Vanessa put together a lovely spread and get together!

Check out the sweet sour cream spiderweb on her seven layer dip - amazing!

Have fun tonight kids!  Be safe out there - and if you have any extra candy, let me know! 

Thursday, October 27, 2011

Burrito Boy!

OK, so you still don't have a Halloween Costume.  And you've got a party to go to TONIGHT.  What do you do?????


Don't worry.  I've got you covered.  Literally!  In tin foil!  Check out this ridiculously easy costume and go as your favorite food - the burrito!  You know its on celebrations.com by now, right?

(PS: The hat you can find here.) 

(PPS: How great a model is Matt?)

Monday, October 24, 2011

Boo!

Keeping up the Halloween spirit! 

Here are some cute cards I made for my niece and nephew.  Hope they aren't too spooooooky!

(Who am I kidding.  Those kids are way tougher than me!)

Sunday, October 23, 2011

Henna Designs

I went to a fun party last week (or, OK I went to several fun parties), but one in particular featured a henna artist!  I gave her my hand and she came up with this beautiful design in just a few minutes.  It was really cool, and I feel super exotic, even when I'm sitting in my cubicle typing away at work. 

It felt cool - literally, cold - while it went on, and then you have to let the paint dry for 30 minutes or so as the design sets.  The paint then flaked off over the course of the night/the next morning and a lovely brownish red design lay beneath the black paint.  Of course I happened to sleep on my hand and woke up with a transferred design on my cheek.  Freaked out for a minute, thinking I would be the new Mike Tyson of my office until it faded away, but luckily with some rigorous scrubbing it disappeared.  Phew. 

I hear that it lasts a week or two, so I will enjoy it until then.  Another woman suggested I put olive oil on it while I am in the shower.  So if you come over and there is EVOO on my sink, that is why. 

Friday, October 21, 2011

Candy Corn Punch

So, I know I piqued your interest two months ago with this post, but if you are looking for a fun Halloween Punch recipe - especially if you live in a warmer climate, check out this one for Candy Corn Punch over at Celebrations.com!  I gave it a try and it was tasty.  Kids will love it - its pretty sweet. 

It does get a little messy - I might try it in a loaf pan rather than a bundt pan, and even serve the sherbet confection as a dessert without the punch.  It looks pretty cool when you slice it! 

Even when its a melted pile of sugar.  Yum!

Thursday, October 20, 2011

Fabulous Flapper Fun

Yet another fantastic fun with foil costume idea! 

OK, so this one is a little fragile - you're probably not going to get more than one wear out of it.  Heavy Duty foil it highly recommended, as is bringing a roll of tape in your purse.  There is a fabric lining so you won't scandalize the world, though, don't fret. 

Cute though, right?  Go here to celebrations.com for full instructions. 

Shimmy Shimmy Shimmy!

Wednesday, October 19, 2011

Does anyone need a viking helmet

One of my favorite Deep Thoughts by Jacky Handey of SNL fame was this:

There was probably an old Viking saying that said, "Ax in the head, early to bed; ax in the helmet, a friend of Helmut."

With that in mind, I give you this fantastic Viking Costume tutorial, via celebrations.com.

Or, I do happen to have an extra viking hat lying around.  If you're interested, let me know :)   

Tuesday, October 18, 2011

Another She-ra share!


You guys, I have to say, my Halloween costume is so freaking fun I wear it around my apartment at night by myself just so I can enjoy it more.  It really is so awesome I can't stand it. 


So here is the skirt and belt I put together.  Again, got my fabric from mood - some sheer cotton that I put together into a ruffle skirt.  A little fluffier that Ms. Ra's, but it does give a bit more bum coverage that I appreciate.  (It can get cold out there!).  I used this tutorial from Grosgrain Fabulous for the base/underskirt, then added two long gathered strips of the same fabric before sewing it up the side.  It's kind of petticoat-y but also super fun! 


The belt I made from some Gold Lame fabric I was given as a birthday present last year (Thanks Sasha!!) - I just cut a wide long strip, folded the right sides together, sewed it along the edge and turned it inside out.  Sewed up the raw end, tied it on and done!  I'm considering adding a large jewel or amulet to the middle..we'll see. 

Nothing is adorning my leotard (a capezio from amazon) because its tough to sew on the stretchy fabric and have it look right.  Am thinking I might make a trip to H&M to snag some cheap flashy gold accessories to complete the look.  Damn, I have some perfect dangley earrings...I wonder where they are? 

In case you missed the first post on my cape...check it out!

Still more to come, don't worry!

Monday, October 17, 2011

Candy Corny

In case you were wondering how I pulled off this sweet costume, the wait it over! 


Check out my tutorial at celebrations.com for complete instructions.  It's super simple!  If you just want to do the tutu, go here!

Sunday, October 16, 2011

Super Girl!

I finally got started on my Halloween costume yesterday.  And it went surprisingly well, considering I kind of made up a pattern in my head.  The big reveal - this year I am going to be:


For those of you who are counting; yes, I have done this costume before.  But I was 3, so I think the statute of limitations has expired. 

Anyway, I ordered a bunch of fabric from mood - a bit fancy schmancy, I suppose, but I had a gift certificate that expires in a couple months, so why not. 


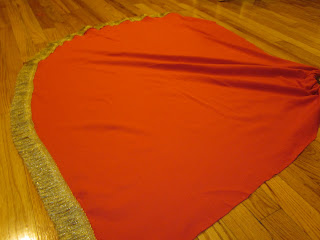
And here is the lovely cape I put together!  So easy too. If you'd like to make your own, or one for the aspiring super hero(ine) in your life, here's how. 

You'll need:
1 yard fabric
 2 feet ribbon
decorative elements (optional)
 measuring tape
scissors
sewing machine or needle & thread
straight pins

Grab some fabric - I used yard of red jersey which is cheap and has a nice drape, but solid cotton will be fine too.  You won't need to hem jersey - cotton may fray, but you can cut with pinking shears to prevent this or add a hem.  You could go fancy and try velour, or something sparkly - use your imagination.  For the length, it depends on your preference/the size of the wearer - I used a little over a yard and the finished project 1 yard and it falls past my bum in the back.  You can adjust it as needed. 

Select some ribbon that you'll use for the neck tie - I used about two feet.  You'll need less for a child's cape, or you could use more if you wanted it to dangle.  Fold over a corner of your fabric so that the resulting flat edge is about the same length around your neck.  Sew a line across this straight edge, at a width just larger than your ribbon.  Slide the ribbon through and trim the extra fabric from the inside of the cape.


Next trim your cape into cape shape.  I measured the distance from the top corner (where the neck is) the bottom edge on one side, and marked that point on the opposite.  I cut a curved line along the bottom to connect these two points, then folded the cape down the middle to make sure it was even.  Cut it on the long side; you can always shorten it. 
I added some gold fringe along the bottom by tacking it on with straight pins and sewing along the edge.  You could add any sort of trim you like here, by sewing or with fabric glue too.  (I know She-ra doesn't have gold fringe on her cape.  But I do.)


Pretty simple!  I've got it hanging on the back of my door so I'm ready to take care of America at a moments notice. 

More to come on the costume front!  I'm worried my skirt is a little fluffy but we'll see...

Saturday, October 15, 2011

Birthday!

My latest card effort...

Happy Birthday Becca!  Can't wait to celebrate with you tonight!

Monday, October 3, 2011

Pie Overload


How did you spend your Saturday?


Mine was awesome!  I got up at 6am and spent the next 8 hours or so baking pecan pies for The Danner Drive.  It was great!  There was a TON of great food - even a little (a lot) of leftover pie to share with friends, family, and very appreciative coworkers after the fact.  Plus, we raised some cash for a good cause!  

Pecan pie is pretty simple.  For the pie crust, I used Mark Bittman's recipe from How to Cook Everything - I always have success with this and its quite easy (as pie! ha!).  You can also use a pre-made crust if you're in a hurry.  

The recipe for the pie itself is the one my Dad has used for Thanksgiving after Thanksgiving - a classic and fail proof, I think.  Try it this Thanksgiving! Or even sooner!  

Pecan Pie
From James Beard's American Cookery

Ingredients
Pastry for One 9 inch pie
1 cup pecan meats - halved or broken pieces
(pecans are pricey!  You can cut them with some walnuts if  you want to save some cash.)
2 eggs
1 cup dark corn syrup
1/2 cup to 1 cup brown sugar  
(I used 1/2 cup - its pretty sweet, so no need to use the higher amount of sugar)
1 tsp vanilla or 2 tbsp rum (I used Jack Daniels - you can taste the booze but in a good, flavorful way)
1/4 tsp salt
2-4 tbsp butter (I used just 2 tbsp)
(My dad adds in 1 tbsp of molasses to cut the sweetness - I didn't have any so I skipped this.  But if you have a jar in your pantry go for it!)

Directions
Line pie pan with pastry and crimp edges.  Sprinkle nuts over pastry. Beat eggs in mixing bowl, stir in syrup, sugar, flavoring, salt.  Pour over nutmeats and dot with butter.  Bake at 450 degrees 10 minutes, reduce heat to 325 degrees and bake until filling is almost firm in center, 25-30 minutes.  Cool on rack. 

Serve at room temperature with whipped cream.

Thursday, September 29, 2011

The Danner Drive

In case you're wondering what I will be doing this weekend: 


Making a buttload of pecan pie!  But its for a good cause though.  Not because I have an odd fascination with pie.  Not because my mom says that I will have to have a tiered series of pies on my wedding day in lieu of a cake.  For charity, guys, come on.  Let's be serious.

My lovely pal Jill is holding a fundraiser Saturday on behalf of her friend Sam:

Sam was biking home from work in Charleston earlier this year and hit by a drunk driver. Sam was badly injured and had to have almost immediate surgery on his knee. The driver didn’t have insurance, and neither did Sam. He now faces over $30,000 in medical bills, and his recovery has been slowed because he simply hasn’t been able to afford the cost of rehab.

I’ve known Sam for over 5 years, having worked together first at Press Here Publicity and then at 7-10 Music, but will always think of him first and foremost as one of the most compassionate, kind, cheerful, and clever people to grace this earth. He’s the kind of friend who calls to check in on you if he hasn’t heard from you in a couple weeks, and tells the dirty jokes you always wish you could have thought of.

In honor of this special Southerner, I’m putting together a Southern-themed cook-off/fundraiser the first weekend of October.

Come sample some of Brooklyn’s best cooks’ offerings, drink some beer, and then cast your vote for your favorite to win! Ticket price includes entry and food, and you’re welcome to bring your own drinks.

Southern Twang Cook-Off & Fundraiser
Saturday, October 1st
4-7PM (Judging at 5:30PM)
684 Leonard Street (Greenpoint, Brooklyn)
Tickets: $25 At Door (It’s BYOB!)

** 100% of proceeds go to Sam **

All are welcome, so please spread the word! Thanks for your love and support!

Cheers, Jill

--------------------------------------------------------------------------------------------------------------------
So, if you're in the NYC area this Saturday, October 1 and want to chow down for a good cause, let me know!  You can also check out Jill's site for the event .

If you can't make it, you can still donate here.

Busting out my pie plates as we speak....


**Update - the donate link above is now fixed - so sorry about that!!**


Tuesday, September 27, 2011

Zombie Punch

Just in case you wanted to add something special to your punch bowl at your your next festive event....


How awesome is this!  Perfect for weddings, bar mitzvahs, birthdays, etc....provided they are all Zombie themed.

OK, fine then, use it just for Halloween if you want to limit yourself.  But really, this is an all purpose idea.  Check out my tutorial here on Celebrations.com!

Monday, September 26, 2011

Care Bear How To

I spent Friday in Danvers, Massachusetts - formerly known as Salem Village (of Witch Hunt Infamy).  While the reason I was there was way more fun - a wedding! - seeing the signs for Salem got me thinking about Halloween. 

Who am I kidding, really?  I start thinking about what I'm going to be for Halloween on November 1.  This year's costume is still in progress but I'm happy to share a tutorial on how I put together something fun for a Halloween of yore!  You may remember my Care Bear Costume:

But now you can make your own!  Check out the tutorial I've put together here on celebrations.com - it's super easy!  You don't even need a sewing machine, kids. 

Start this weekend, and you won't be stressing over what to wear in a month's time - and you'll have a unique homemade costume to boot! 

Sunday, September 25, 2011

Party Hats for Grown Ups

Another fun activity we did for Sasha's birthday - DIY birthday hats!

None of the participants were under the age of 29, but we all got creative and made some damn fine hats!  We used craft supplies I had on hand - cardstock, ribbons, googly eyes, pipe cleaners, and more, which was super fun, and free!  A great excuse to get a little silly. 

Try it out for your next birthday bash! 

Friday, September 23, 2011

Yay for Beth and Geoff!

An amazing celebration is happening today - Beth and Geoff's wedding is upon us!

Congratulations you two crazy kids!

Thursday, September 22, 2011

Animal Farm

Another stop on our Block Island Adventure - The Abrams Animal Farm near the Manisses hotel. 

Lots of animals to pet and feed and coo over. 
Not that I did that.  I may be one of the only vegetarians that doesn't get all mushy around cute animals.
Melissa loves them though.  So they weren't neglected, don't fret. 

Personally, I really loved this turtle statue.  And in case you were wondering, yes, I am indeed wearing both leggings (the first of the season for me!) and a bathing suit under my dress.  I'm prepared for anything, kids.  (I did go swimming after all.)

Wednesday, September 21, 2011

Congratulations Sasha & Billy!

I spent the weekend with one of my oldest and dearest pals  - and some other excellent individuals, too.  It was Sasha's 30th birthday bash, but Billy had a surprise...

Yay!  So happy. 

Tuesday, September 20, 2011

What time is it?

Man I love winning stuff! 

I entered a twitter contest via ideeli earlier this summer, and won!  I finally got my prize today - so cool!  A hot pink La Mer wraparound watch.  Way cooler than me.  

I like that site - some major deals to be had.  Plus now I like them better since I won this!  They do a new prize every Friday - check out their twitter: @ideeli, #flashfriday.  While you're at it, check out mine: @emmanemhandmade

Fun!   

Monday, September 19, 2011

Happy Birthday Sasha!

Happy Birthday Friend!  You are the very best. 

Also, you are way cooler than me too, so thanks for still being my friend even after 25 years of crazy.

Love! 

Thursday, September 15, 2011