Monday, October 31, 2011

Happy Halloween!!

 HAPPY HALLOWEEN EVERYONE!!!
I hope you all had a delightful time this weekend at your parties, and that all of you little trick or treaters have a great time tonight!  I wanted to share the finished product of my She-ra costume - ta da!!


 And even better - my friend Matt decided to be He-man!  So of course we had to celebrate the festivities together on Saturday night. 


We came up with these costume ideas separately - but what a lovely coincidence!  I gave Matt a hand in putting together his costume too.  I think we both look pretty cool!  Cool enough to brave the crazy rain and snow this weekend in costume, anyway.  We had to share the power of Grey Skull with the world, you know. 
Matt's roommate Vanessa put together a lovely spread and get together!

Check out the sweet sour cream spiderweb on her seven layer dip - amazing!

Have fun tonight kids!  Be safe out there - and if you have any extra candy, let me know! 

Thursday, October 27, 2011

Burrito Boy!

OK, so you still don't have a Halloween Costume.  And you've got a party to go to TONIGHT.  What do you do?????


Don't worry.  I've got you covered.  Literally!  In tin foil!  Check out this ridiculously easy costume and go as your favorite food - the burrito!  You know its on celebrations.com by now, right?

(PS: The hat you can find here.) 

(PPS: How great a model is Matt?)

Monday, October 24, 2011

Boo!

Keeping up the Halloween spirit! 

Here are some cute cards I made for my niece and nephew.  Hope they aren't too spooooooky!

(Who am I kidding.  Those kids are way tougher than me!)

Sunday, October 23, 2011

Henna Designs

I went to a fun party last week (or, OK I went to several fun parties), but one in particular featured a henna artist!  I gave her my hand and she came up with this beautiful design in just a few minutes.  It was really cool, and I feel super exotic, even when I'm sitting in my cubicle typing away at work. 

It felt cool - literally, cold - while it went on, and then you have to let the paint dry for 30 minutes or so as the design sets.  The paint then flaked off over the course of the night/the next morning and a lovely brownish red design lay beneath the black paint.  Of course I happened to sleep on my hand and woke up with a transferred design on my cheek.  Freaked out for a minute, thinking I would be the new Mike Tyson of my office until it faded away, but luckily with some rigorous scrubbing it disappeared.  Phew. 

I hear that it lasts a week or two, so I will enjoy it until then.  Another woman suggested I put olive oil on it while I am in the shower.  So if you come over and there is EVOO on my sink, that is why. 

Friday, October 21, 2011

Candy Corn Punch

So, I know I piqued your interest two months ago with this post, but if you are looking for a fun Halloween Punch recipe - especially if you live in a warmer climate, check out this one for Candy Corn Punch over at Celebrations.com!  I gave it a try and it was tasty.  Kids will love it - its pretty sweet. 

It does get a little messy - I might try it in a loaf pan rather than a bundt pan, and even serve the sherbet confection as a dessert without the punch.  It looks pretty cool when you slice it! 

Even when its a melted pile of sugar.  Yum!

Thursday, October 20, 2011

Fabulous Flapper Fun

Yet another fantastic fun with foil costume idea! 

OK, so this one is a little fragile - you're probably not going to get more than one wear out of it.  Heavy Duty foil it highly recommended, as is bringing a roll of tape in your purse.  There is a fabric lining so you won't scandalize the world, though, don't fret. 

Cute though, right?  Go here to celebrations.com for full instructions. 

Shimmy Shimmy Shimmy!

Wednesday, October 19, 2011

Does anyone need a viking helmet

One of my favorite Deep Thoughts by Jacky Handey of SNL fame was this:

There was probably an old Viking saying that said, "Ax in the head, early to bed; ax in the helmet, a friend of Helmut."

With that in mind, I give you this fantastic Viking Costume tutorial, via celebrations.com.

Or, I do happen to have an extra viking hat lying around.  If you're interested, let me know :)   

Tuesday, October 18, 2011

Another She-ra share!


You guys, I have to say, my Halloween costume is so freaking fun I wear it around my apartment at night by myself just so I can enjoy it more.  It really is so awesome I can't stand it. 


So here is the skirt and belt I put together.  Again, got my fabric from mood - some sheer cotton that I put together into a ruffle skirt.  A little fluffier that Ms. Ra's, but it does give a bit more bum coverage that I appreciate.  (It can get cold out there!).  I used this tutorial from Grosgrain Fabulous for the base/underskirt, then added two long gathered strips of the same fabric before sewing it up the side.  It's kind of petticoat-y but also super fun! 


The belt I made from some Gold Lame fabric I was given as a birthday present last year (Thanks Sasha!!) - I just cut a wide long strip, folded the right sides together, sewed it along the edge and turned it inside out.  Sewed up the raw end, tied it on and done!  I'm considering adding a large jewel or amulet to the middle..we'll see. 

Nothing is adorning my leotard (a capezio from amazon) because its tough to sew on the stretchy fabric and have it look right.  Am thinking I might make a trip to H&M to snag some cheap flashy gold accessories to complete the look.  Damn, I have some perfect dangley earrings...I wonder where they are? 

In case you missed the first post on my cape...check it out!

Still more to come, don't worry!

Monday, October 17, 2011

Candy Corny

In case you were wondering how I pulled off this sweet costume, the wait it over! 


Check out my tutorial at celebrations.com for complete instructions.  It's super simple!  If you just want to do the tutu, go here!

Sunday, October 16, 2011

Super Girl!

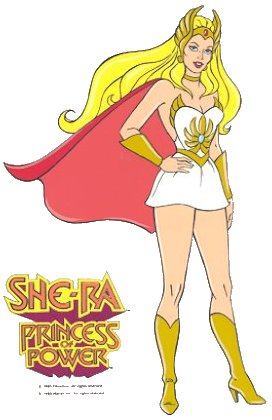
I finally got started on my Halloween costume yesterday.  And it went surprisingly well, considering I kind of made up a pattern in my head.  The big reveal - this year I am going to be:


For those of you who are counting; yes, I have done this costume before.  But I was 3, so I think the statute of limitations has expired. 

Anyway, I ordered a bunch of fabric from mood - a bit fancy schmancy, I suppose, but I had a gift certificate that expires in a couple months, so why not. 


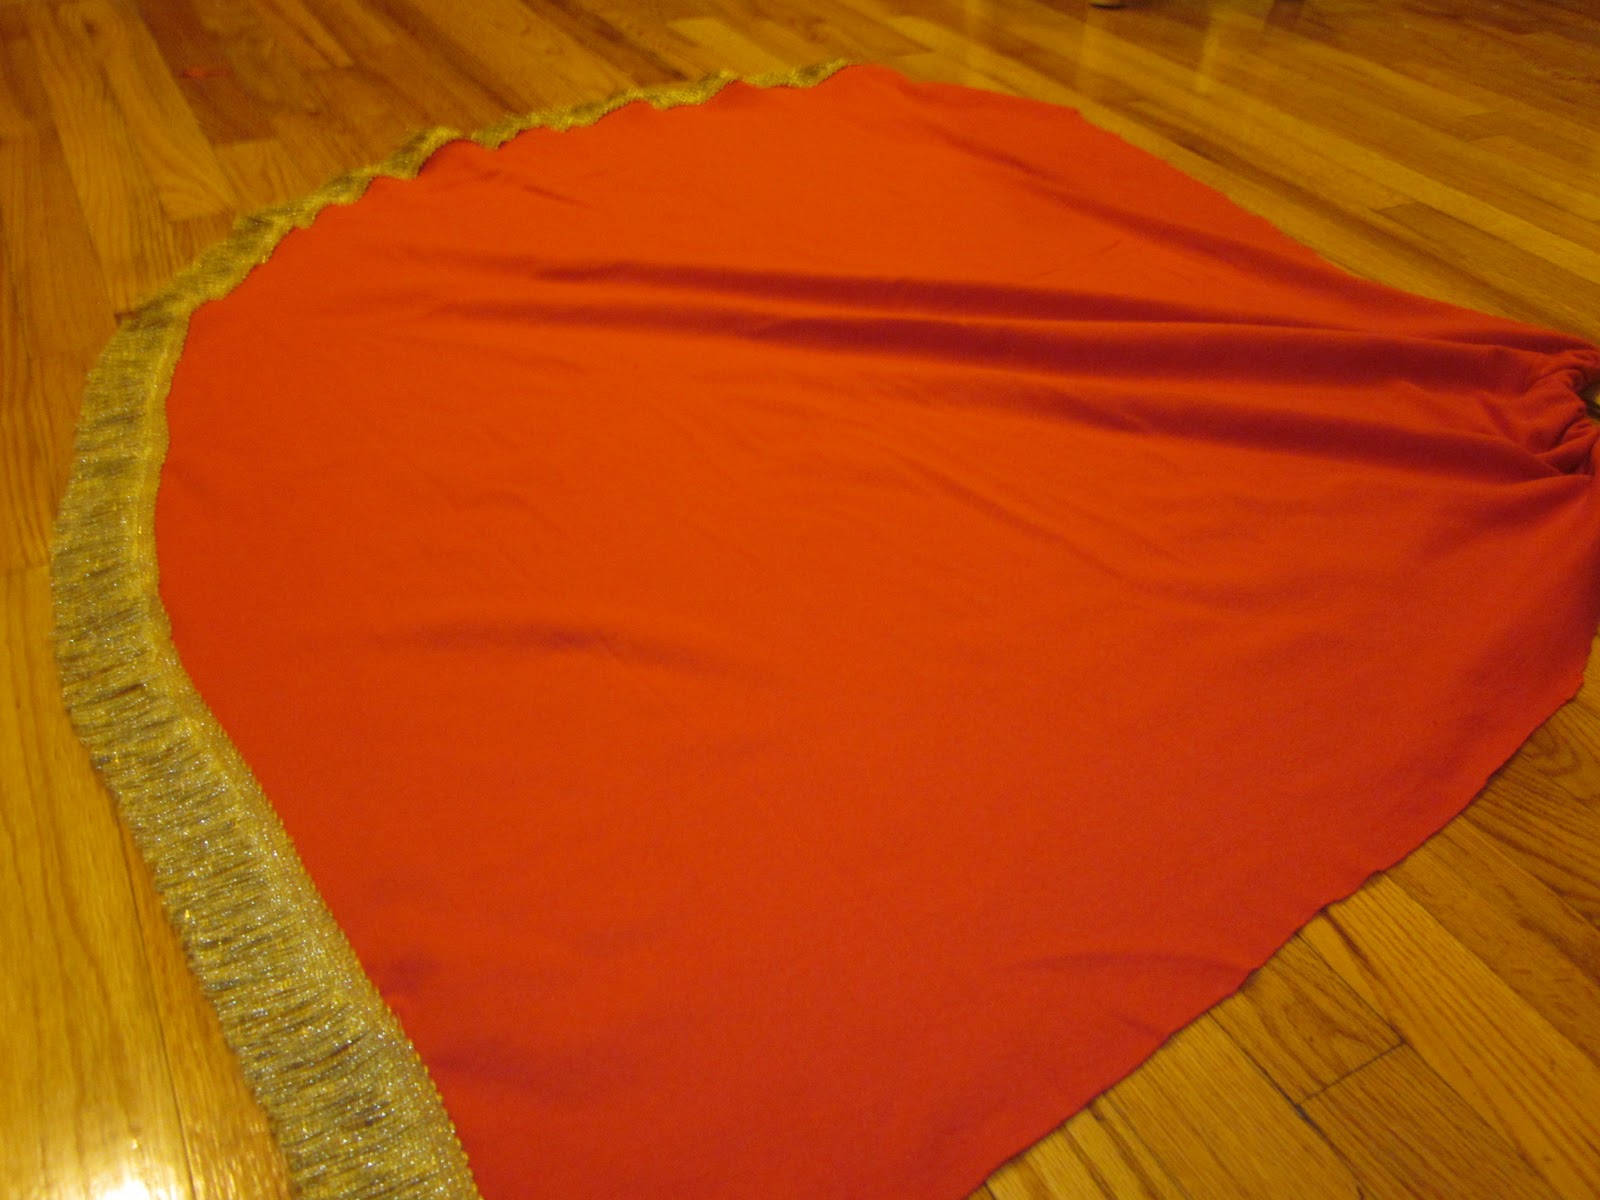
And here is the lovely cape I put together!  So easy too. If you'd like to make your own, or one for the aspiring super hero(ine) in your life, here's how. 

You'll need:
1 yard fabric
 2 feet ribbon
decorative elements (optional)
 measuring tape
scissors
sewing machine or needle & thread
straight pins

Grab some fabric - I used yard of red jersey which is cheap and has a nice drape, but solid cotton will be fine too.  You won't need to hem jersey - cotton may fray, but you can cut with pinking shears to prevent this or add a hem.  You could go fancy and try velour, or something sparkly - use your imagination.  For the length, it depends on your preference/the size of the wearer - I used a little over a yard and the finished project 1 yard and it falls past my bum in the back.  You can adjust it as needed. 

Select some ribbon that you'll use for the neck tie - I used about two feet.  You'll need less for a child's cape, or you could use more if you wanted it to dangle.  Fold over a corner of your fabric so that the resulting flat edge is about the same length around your neck.  Sew a line across this straight edge, at a width just larger than your ribbon.  Slide the ribbon through and trim the extra fabric from the inside of the cape.


Next trim your cape into cape shape.  I measured the distance from the top corner (where the neck is) the bottom edge on one side, and marked that point on the opposite.  I cut a curved line along the bottom to connect these two points, then folded the cape down the middle to make sure it was even.  Cut it on the long side; you can always shorten it. 
I added some gold fringe along the bottom by tacking it on with straight pins and sewing along the edge.  You could add any sort of trim you like here, by sewing or with fabric glue too.  (I know She-ra doesn't have gold fringe on her cape.  But I do.)


Pretty simple!  I've got it hanging on the back of my door so I'm ready to take care of America at a moments notice. 

More to come on the costume front!  I'm worried my skirt is a little fluffy but we'll see...

Saturday, October 15, 2011

Birthday!

My latest card effort...

Happy Birthday Becca!  Can't wait to celebrate with you tonight!

Monday, October 3, 2011

Pie Overload


How did you spend your Saturday?


Mine was awesome!  I got up at 6am and spent the next 8 hours or so baking pecan pies for The Danner Drive.  It was great!  There was a TON of great food - even a little (a lot) of leftover pie to share with friends, family, and very appreciative coworkers after the fact.  Plus, we raised some cash for a good cause!  

Pecan pie is pretty simple.  For the pie crust, I used Mark Bittman's recipe from How to Cook Everything - I always have success with this and its quite easy (as pie! ha!).  You can also use a pre-made crust if you're in a hurry.  

The recipe for the pie itself is the one my Dad has used for Thanksgiving after Thanksgiving - a classic and fail proof, I think.  Try it this Thanksgiving! Or even sooner!  

Pecan Pie
From James Beard's American Cookery

Ingredients
Pastry for One 9 inch pie
1 cup pecan meats - halved or broken pieces
(pecans are pricey!  You can cut them with some walnuts if  you want to save some cash.)
2 eggs
1 cup dark corn syrup
1/2 cup to 1 cup brown sugar  
(I used 1/2 cup - its pretty sweet, so no need to use the higher amount of sugar)
1 tsp vanilla or 2 tbsp rum (I used Jack Daniels - you can taste the booze but in a good, flavorful way)
1/4 tsp salt
2-4 tbsp butter (I used just 2 tbsp)
(My dad adds in 1 tbsp of molasses to cut the sweetness - I didn't have any so I skipped this.  But if you have a jar in your pantry go for it!)

Directions
Line pie pan with pastry and crimp edges.  Sprinkle nuts over pastry. Beat eggs in mixing bowl, stir in syrup, sugar, flavoring, salt.  Pour over nutmeats and dot with butter.  Bake at 450 degrees 10 minutes, reduce heat to 325 degrees and bake until filling is almost firm in center, 25-30 minutes.  Cool on rack. 

Serve at room temperature with whipped cream.